Thursday, December 4, 2008
Chainlink Garden, Finishing Floors and Cabinets
The garden tub inside the chain link "box". I have planted grape, passion vine and other vines to cover the fencing.
Since I like to have natural ventilation, this felt like the best solution for security when leaving sliding screen doors open.
I used some recycled pavement like the ones for the car pad in front of the garage.
Here you can see most of the cabinet fronts --some are being recut and no handles, or toe plates are on yet. The wood is sustainable rustic alder stained with a very light coating of ebony. I am doing the interior doors with the same color; I found some VOC-free stain at EcoProcote (it doesn't effect my breathing at all.
I had just grouted the floor in the center of the space. I plan to get it cleaned and sealed/enhanced before I move in.
Saturday, November 1, 2008
Solar Hot Water Collector & More Tiling
A view of the front. The black plastic was used to temporarily kill weeds. I am not having any turf, just plant beds and mulch or gravel walkways. That means I will have absolutely nothing to mow or irrigate regularly.
The solar hot water collector, on the stand that ECS erected.
I have almost completed the guest bedroom floor. I have the small tiles to layout and attach in one other room and part of the entryway yet to complete. All the large tiles are down and almost all are attached.
The upper kitchen cabinets without doors. The dishwasher is installed, the refrigerator, stove and microwave are just sitting out of place.
Saturday, October 11, 2008
Solar Hot Water Tank, Tiling, Backsplash
Here is the solar hot water tank and circulator. The PV inverter is on the wall in the corner. They are completing the structure to support the collector on the roof now, it should be complete this week. Typically they are easily mounted on a traditional roof, so this house presented a challange to mount on the ground such that it would be pitched properly to drain into the tank by gravity. Since the house is protected by the membrane, they had to build the structure off of the house into the slope beside the house. ECS of Gainesville has been up to the challenge
The tiling is coming along slowly, since my breathing condition only allows me to work a few hours at a time. I lay out the large tiles and attach, then fill in with the broken tiles, attach those, and finally grout.
The backsplashes have been installed and the granite enhanced and sealed.
Here is a view from up the driveway. The house sits back over 500 feet from the road, and cannot be seen from the road.
Sunday, September 28, 2008
Garage Doors, Cabinet Bases, Stairs to "Roof"
This is a view of the inside of the utility room (part of the garage module). I have a sort of hybrid mini-split/ducted HVAC system that should be super efficient. The solar hot water tank will go in this space also--to be put in this week.
I had some stairs built to make is safer and easier to get on top of the house.
The kitchen cabinet bases are in with part of the counter top. I am using a common granite (baltic brown) turned upside down and sandblasted to give a more natural, mat, stone look. The edges are chiseled to look even more like stone. The floor here is partially done; I completed and grouted the areas under the bases. Now I have the task of attaching and filling in with broken tile the rest of the floor.
Here is the recycled pavement car pad and the garage doors installed.
A more current view of the entire house.
Tuesday, September 2, 2008
Septic, Solar PV and Tiling
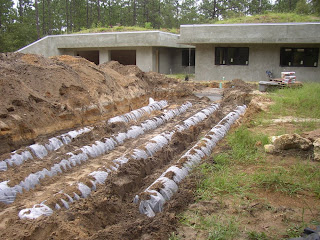
The drain field for the septic system.
The tiling in the master shower. I still need to grout the vertical tiling.
Their were multiple cracks throughout the kitchen/living/dining room slab--so I had a crack isolation membrane installed before I tiled.
The solar PV panel. Along with the solar hot water, I should be selling KWs back to the electric company during the day.
Sunday, July 6, 2008
Interior Stucco and Tile
The garden tub is finished, the grade will be higher than is shown in the photo so that only about 16 inches will be out of the ground.
Below you can see the stucco color of the interior and the way I am laying out the tile. This is the master closet.
The pond is full, I am conditioning the water before I add some little fish. It has attracted dragonflies immediately after being filled. I plan to cover the bottom and side edges with pond pebbles and gravel, I need to get some more bentonite to help hold the stones in place on the membrane.
Tuesday, June 24, 2008
Sealing and Scaffolding
The exterior stucco was sealed with this, non-toxic, water-based concrete sealer. The color was not effected at all.
The interior scaffolding to apply a rough coat of stucco to even out the surface, before the final color is applied.
A portion of the lath in the module that is divided into two rooms, bath and entryway. The ductwork is for the air handler portion of the ductless, mini-split (heat pump)system.
A view from the south of the rear of the house, the scaffolding was for the application of the sealers. I just planted an edible fig plant in the right foreground.
The tub is getting closer to done. I just have some more grouting to do.
Wednesday, June 11, 2008
Cap on Parapet
I am experimenting with plants that may be able to live on the roof, without much attention. I have planted; perennial peanut, several varieties of Alternantera, lantana, native love grass, fakahatchee grass, dwarf Mexican petunia, flax lily, Asian jasmine (variegated and green), honeysuckle vine, juniper, rosemary, and lavender. These have all survived several weeks, though I am watering them until they are established.
The front with stucco and cap on parapet. This is the final color. It is 1/2 lb. Irish green pigment per sack of gray stucco. I wanted a very subtle green, that would look like a natural stone color.
Antigone found a sub's lunch leftover. She is not so interested in the white bread as the thin slice of ham stuck to the other side.
The cap at the back of the house, this photo does not show the finished stucco yet.
Saturday, May 31, 2008
Exterior Stucco, Tub and Rooftop
I have begun to plant some ground cover on the house. I am choosing xeric plants that should not need much water after being established.
Here is the concrete block garden tub after being coated with stucco.
I am covering the tub in broken tile.
This stucco coat is the under coat for the finish which will be similar in color, once the metal cap is installed, the final coat will be put on. The stucco is pigmented, and will not be painted.
Wednesday, May 14, 2008
Foam Insulation Prior to Stucco
The front of the house has been papered and lathed for the stucco. This went atop a layer of 2" EPS foam.
The back of the house with the 2" foam applied.
The front with the foam. The only part of the roof left to finish is the right corner where the ramp must be closed off before we can spread all the topsoil. Then the galvalume cap will be installed at the top of the parapet (cement blocks are holding the membrane in place in the photo).
The module that is divided into two rooms and a bath. The ceilings will go up to the dome except in the closets and bathroom.
We had some extra fill so the excavator has made some privacy mounds for landscaping.
Monday, May 12, 2008
Framing and Windows Installed
The framing for the curved, descending wall for the master bath shower. This will be lathed then stucco applied before I tile the inside and out. I designed the shower this way to maximize the light into the bath from the window in the shower.
One of the 3 panel sliding doors and the master bath window.
The floor pour went well.
The framers are doing a great job framing the domed areas.
Here you can see the vent openings brought out to the side of the building just outside the membrane area.
The pole installed at the side of the mound on the south side of the house for the solar pv panel.
Subscribe to:
Posts (Atom)